The most important factor, especially in the field of calibration of analytical instruments is periodic calibration to specific standards in order to ensure exact results. We offer from simple binary mixture to more complex multi component mixtures with degree of accuracy and reliable delivery schedule to ensure complete customer satisfaction. Prime Vision Industrial Gas Trading LLC has its unit in Turbhe, Navi Mumbai which manufactures these calibration gases.
Prime Vision Industrial Gas Trading LLC supplies an extensive range of calibration standards according to individual customer requirements comprising of various components listed below. However we would be pleased to receive enquiries even for unlisted components. Prime Vision Industrial Gas Trading LLC is always striving to increase the width and depth of its product lines.
Quality
The quality of calibration standards depends upon three specific criteria.
Accuracy
Traceability
Stability
Method of analysis
Once filled the cylinders are analyzed and checked.
—– so that the mixture composition is correct
—– so that the product purity is within specification
Prime Vision Industrial Gas Trading LLC follows the ISO 6143 standard, the degree of accuracy of the analysis determines the grade of the product sold and the closer the accuracy to the absolute concentration the more difficult and hence more expensive the product. Prime Vision Industrial Gas Trading LLC will choose the best combination of filling and analytical methods to meet customer specification.
Accuracy
The accuracy of a calibration standard has two elements.
——– the filling accuracy
——– the analytical accuracy
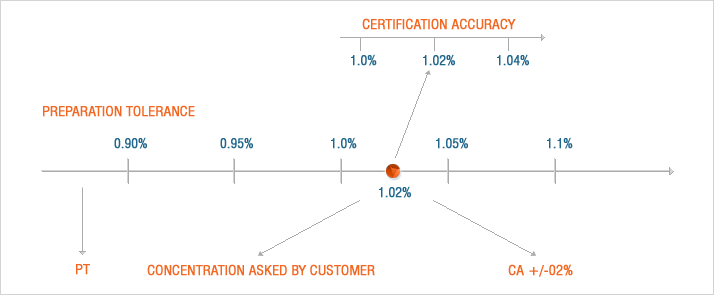
If a mixture is prepared with a nominal component concentration of 5% and a filling tolerance of +/- 10% then the supply will be a mixture between 4.5% and 5.5% the actual concentration. Having prepared the mixture will then be certified with an accuracy of +/- 2% so that if during analysis by Prime Vision Industrial Gas Trading LLC the analytical instrument gives a result of 5.2% concentration then Prime Vision Industrial Gas Trading LLC certifies that the mixture will have concentration of between 5.1% to 5.3%.
Production of Calibration Gases
The production of calibration gases follows the flow chart below. A simpler flow chart is followed for industrial mixtures where the accuracy is not that important. The selection of production method depends on which components are to be included in the mixture and the accuracy required on the certificate.
The correct choice of cylinder material and valve, together with special internal treatment of the cylinder, are essential to achieve stable mixtures.
There are three different production methods for gas mixtures
Gravimetric: International standard 6142
The gravimetric method, where each component is weighed separately, is the most accurate and is used for production of Proton primary standards.
Gravimetric mixtures are normally certified according to the gravimetric production data and analysed to verify the values.
Manometric: International standard 6146
Mixture produce according to the manometric method(partial pressure of each component is measured).These products are certified based on the results from the analysis.
Volumetric: International standard 6144
The volumetric method (volume of each component is measured).These products are also certified on the basis on data from the analysis.
Order
Choice of cylinder, valve and raw material quality. filling parameters determined
Control and primary treatment of cylinders
Filling of gas components
Homogenising
Analysis
Final control and certification
Dispatch
All stages of the production process, from receipt of the order to dispatch of the product, are subjected to strict quality assurance requirements. The production of special gas compounds is certified pursuant to ISO 9002.
Why Accuracy
High performance gas analyzers need high quality gases
More cost effective process (higher yield)
Optimal process conditions (less maintenance, less shut down)
Reliability of the products
Better products give better prices
How do we achieve Accuracy
Accurate Analysis of Raw Materials
Accurate Production Methods
Passivation of Cylinder Inner Surface
Avoid Chemical / Physical Interaction
Using Standard Traceable to NPL/NIST Standards
Preparation Tolerance and Certification Accuracy
In addition to the composition of a mixture two important factors are preparation tolerance and certification accuracy.
Preparation Tolerance (PT) is a measure of the closeness of our product concentration to the ordered concentration. It varies with concentration but can also be specified if required. The following table will indicate our standard PT.
| Standard Specifications for Calibration Gas, Specialty Gas, Natural Gas, Petrochemical and Refinery Gas Standards | ||||||||||||||||||||||||||||||||||||||||||||||
|---|---|---|---|---|---|---|---|---|---|---|---|---|---|---|---|---|---|---|---|---|---|---|---|---|---|---|---|---|---|---|---|---|---|---|---|---|---|---|---|---|---|---|---|---|---|---|
|
The Blend Tolerances and Certification Accuracy are expressed as the relative percentage deviation from the requested concentration of the individual components. Certification Accuracy for Primary Standards over 2% concentration will be ± 0.02% absolute of the reported value.
Tolerances of minor components below 5ppm may vary depending on the component and the complexity of the mixture.

Each component is reported at the requested concentration ± the % stated for the concentration range.